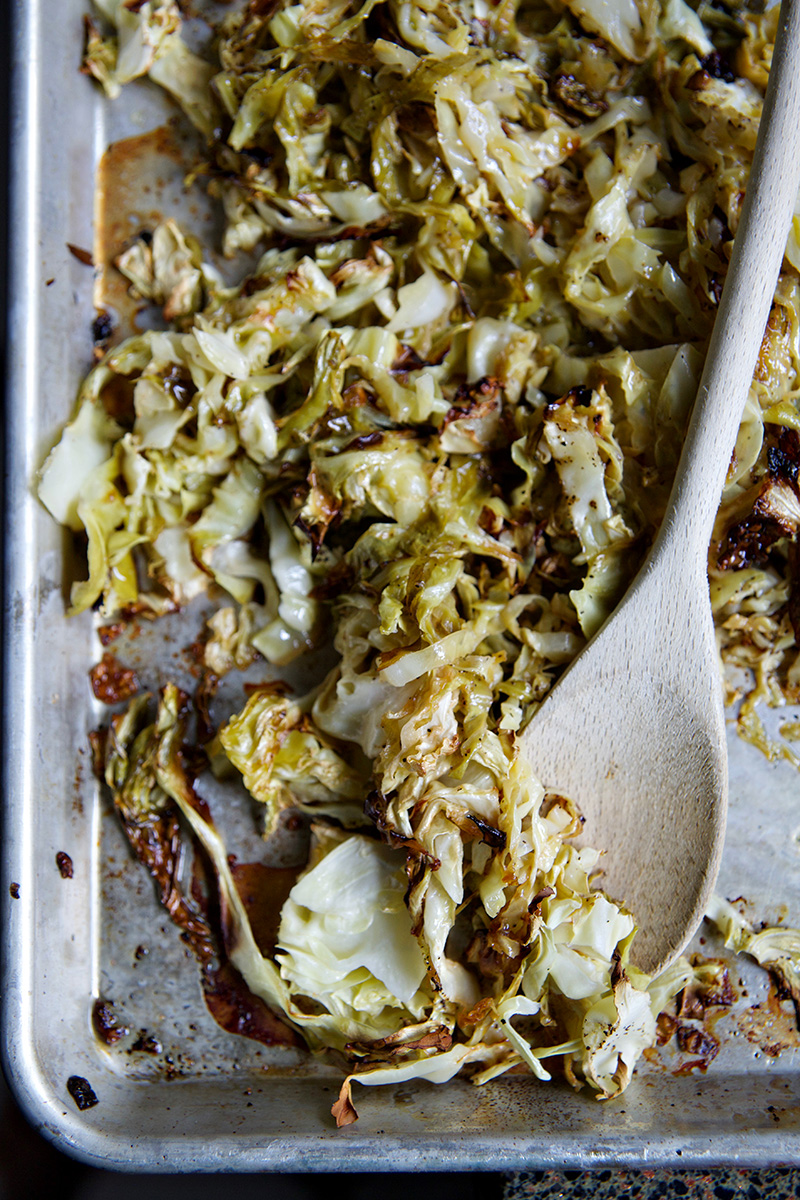
Category Archives: vegetables

Quinoa Stuffed Portabellas

This month Dan and I are eating a little differently. Part cleanse, part elimination diet, part recipe-creating challenge, we’ve cut some things out to shock our bodies and our habits. We’re 8 days in and I’m split between loving it and thinking it’s stupid. Basically, we’re doing no meat, no booze, and low carbs. The low carbs has been umbrellaed to mean both no processed grain and very few whole grains. I really want a super fluffy pancake. What I have enjoyed, however, is the challenge of coming up with meals that fit into this very limited scope. I’ve been experimenting a lot (I made cauliflower falafel!) and we’ve both tried things outside our comfort zone. I think that even after May 1st we’ll keep some of these recipes in our canon. Tonight’s dinner, for instance, is portabellas stuffed with quinoa, feta, and shallots. Simple, delicious, and extremely full of good.

Quinoa Stuffed Portabellas

4-6 large portabellas, depending on how many you’re serving

2 cups cooked quinoa

1 cup crumbled feta

1 tbsp butter

1 large shallot

1 tbsp fresh rosemary

Dash of curry

Dash of garlic powder

Dash of paprika

Dash of pepper

Dash of salt

Olive oil to drizzle

Parmesan to top

Cook your quinoa. Stem and gill your mushrooms.  In butter, sauté shallots (sliced) and rosemary (chopped) until tender. Mix together quinoa, feta, shallots, and spices. Place the mushrooms top down on a baking sheet. Fill them with quinoa mixture. Drizzle with olive oil and top with grated parmesan. Bake at 350 for 25 minutes or until the mushrooms are tender.

Kale Chips

Lately, I’ve felt a little bit underwater. Between a demanding workload, travel (for work and for fun) messing with my schedule, and life starting to feel like it was going faster than I could keep up, I’ve felt unraveled. It’s not a great feeling, but it happens. And when it does, I often spiral into a pit of comfort food and slouching before I realize what’s happened and drag myself out. This week, I’m working on dragging myself out.

When I’m feeling lazy or overwhelmed or unmotivated I like to turn to something I know will get me excited. This week I decided to read one of my favorite books, Born to Run, again. About a year and a half ago I read it for the first time and was so motivated and inspired that I started running, seriously. I’ve loved every minute of it… I was always a swimmer and an active person, but until I trained my body to run in a barefoot style, I was never able to run injury free. Watching my body get stronger as I accumulated miles has been amazing. I’ve been running consistently for quite some time, even through bouts of laziness or ennui, but that isn’t always enough. One thing I love about Born to Run is that it focuses on the nutrition aspects of successful distance running as well as the technique. So, after rereading the book on the flight home, I felt a new motivation to delve back into nutrition.

Don’t worry, I’ll still be recreating the fried chicken eggs benedict we had in San Diego and posting a recipe for Pi(e) Day. Over the years I’ve learned enough about our bodies and nutrition to know that everything in moderation is fine. But lately it’s been more burgers than arugula, and this week I’m trying to reboot the system. So I thought, as I recover from our (amazing) trip and try and get my head on straight, I’d share a quick and easy recipe for kale chips. I made a huge batch last night and I’ll be snacking away on these all week.

Kale Chips

1 bunch of kale

Olive oil

Sea salt

Red pepper flakes

Slicing around the thicker veins and stems, cut your kale down into 2″ squares. Place in a large bowl and drizzle with olive oil. Sprinkle on a tsp of sea salt, a dash of red pepper, and toss. Line a baking sheet with parchment paper and bake at 300 for 20 minutes. It took me three of four batches to get through a large bunch of curly kale.

Breakfast Nests

I love eggs. And not to sound like a total hipster, but I loved eggs before they were cool.  Pie too. And toy camera photography.  Not leggings though, I’m totally jumping on the trend bandwagon there… But eggs, we’ve always been good friends, especially when a dippy yolk is involved.  Breakfast sandwiches, breakfast pizza, pasta carbonara, I love it.  So, it goes without saying that a cupful of breakfast goodness topped with a soft yolked egg is pretty close to heaven in my book.  Egg heaven.

This recipe was very much a Saturday morning refrigerator dump.  My favorite kind of weekend breakfast, where you sauté up all the leftover vegetable odds and ends from the week, add bacon and a fried egg and, voila, breakfast.  I started with a turkey bacon cup (it was what we had on hand, usually I’m a real-bacon-all-the-way kind of girl), filled it with chard and onions, garlic and potato.  Then we topped the whole mess with an egg and baked.

Dan and I have very different preferences when it comes to eggs- I like mine running all over the place and he likes his firm.  This difference of opinions doesn’t usually impact our relationship, (we’re pretty level headed people when it comes to our eggs) except for when I make a dish like this where the eggs are all cooked together.  If, like me, your family has varying levels of egg preference I have a suggestion- for those that like a drippy, yolky egg, follow the recipe.  For those that don’t, leave out the egg and then top the baked bacon/veggies with a fried egg.  Overcooking an egg in the oven leaves the yolk hard and weird, so I’ve found, after a lot of searching for the middle ground, it’s best just to fry a separate egg.

Breakfast Nests

(makes four)

8 pieces of bacon

4 eggs

2 cups chopped (uncooked) chard

1/2 red onion

1 red potato

2 cloves garlic

Salt, pepper, red pepper

1 pat butter

In your pan, cook the bacon until the fat has begun to come off and it starts to crisp.  Take the hot bacon and mold it into a cupcake pan.  Wrap one slice all the way around the inside of the cup, tear the other piece in half and line the bottom. Preheat your oven to 350

Chop onion, potato, and garlic and add it to the pan.  Saute for one minute.  Chop the chard.  Add it in, along with the butter and seasoning.  Toss and cook until chard has wilted.  Divide between the four cups, pushing it down so that there is at least 3/4 inch of room between the vegetables and the top of the bacon.

Crack an egg over the sink, tossing 1/3 of the whites.  Put the yolk and remaining whites into a cup.  Repeat with the remaining three cups.

Bake at 350 until whites have set.  Yolk should be soft, approximately 20 minutes.

Tomato Basil Jam

As of five thirty yesterday afternoon, I am on my beach vacation. We left Baltimore Friday and headed to Raleigh for my cousin Elizabeth’s wedding. After a wonderful and fun filled wedding weekend and lunch with my sweet friend Julia and my mom, we packed up and drove to Morehead City.

Today we’ll take the boat out to Cape Lookout, eat burgers and pimento cheese, swim and laugh. I love the beach.

I wanted to share this tomato jam recipe before I check out for the week. It’s sweet and a little spicy, perfect on cheese, eggs, or burgers. See you soon!

Tomato Basil Jam

4 cups diced tomatoes
1/2 cup diced basil
3 cups sugar
Juice of 3 lemons
1 tbsp red pepper flakes
1 tsp salt

After cutting down your tomatoes, combine them with the remaining ingredients in a non- reactive pot. Simmer for 1-2 hours, or until reduced by half.

About an hour before you want to can fill two large pots with water. I recommend that you have some canning equipment, at the very least a large pot with a rack and a pair of tongs. You’ll need a separate pot for sterilizing your jars and lids. Bring both pots of water to a boil. In one pot (the one without a lid) place your jars and the lids (not the screw bands). Allow them to boil for at least 10 minutes, but keep them in the pot until right before you fill them.

Use a spoon to fill the jars, leaving 1/4″ of room at the top. Use a spoon to make sure there are no bubbles in the jar, and adjust the headspace (space between the jam and the top of the jar) as needed. Wipe the rim with a sterile cloth and fish a lid out of the pot. Place the lid onto the jar and screw the band on tightly. Set aside and repeat with all of your jars.

Take the rack from the other pot and place the jars onto it. Lower the rack into the pot (whose water should be boiling) and process the jars for 10 minutes. Remove them from the water and (here’s the hardest part) wait for the ping. When they first come out of the water the jar should pop up and down, but when the jars seals you won’t be able to pop the jar any more. Some jars will seal immediately, some will take a little longer, and some may not at all. If jars fail to seal, store them in the fridge for up to two weeks. The jars that do seal, however, are good in a cool dark space for up to a year. Enjoy!

**As with any preservation process, there are risks. If you notice anything abnormal, discard the jam immediately. Botulism is no fun.**

Grilled Squash Salad

Lately it seems like a lot of my plants are leaving me for the big organic farm in the sky.  I’ve said goodbye to a few tomato plants, three squash plants, and a cucumber.  The only thing looking fat and happy in these ridiculous temperatures are my okra.  Note to self: when it gets so hot that almost nothing will grow, figure out more ways to cook okra.

Despite the untimely demise of half my garden, I have been able to harvest quite a bit of fruit and vegetables.  This past weekend I had a party to go and the squash was piling up on my counter (and I couldn’t imagine turning on my oven to make a pie), so I threw together this quick grilled salad.


I was pleased with how it turned out.  It was light and refreshing with a burst of lemon and some good charred grill flavors.  It’s so rewarding to finally start cooking with what’s growing out back, it makes all the hard work worth it, a thousand times over.

Grilled Squash Salad

2-3 medium size squash, whatever variety you prefer

1 red onion

1 cup chopped cherry, yellow pear, or grape tomatoes

Juice of two lemons

4-6 okra

Salt

2 tbsp balsamic vinegar

1 tbsp olive oil, plus more for brushing on the vegetables

Fresh basil and oregano, chopped

This salad is great because it can really be made up of whatever you have on hand.  Slice your squash and okra and brush with oil.  Grill for 2-4 minutes on each side over medium heat.  Remove, chop, and combine with chopped tomatoes, lemon juice, oil and vinegar, salt, and herbs.  Chill for 2 hours before serving.