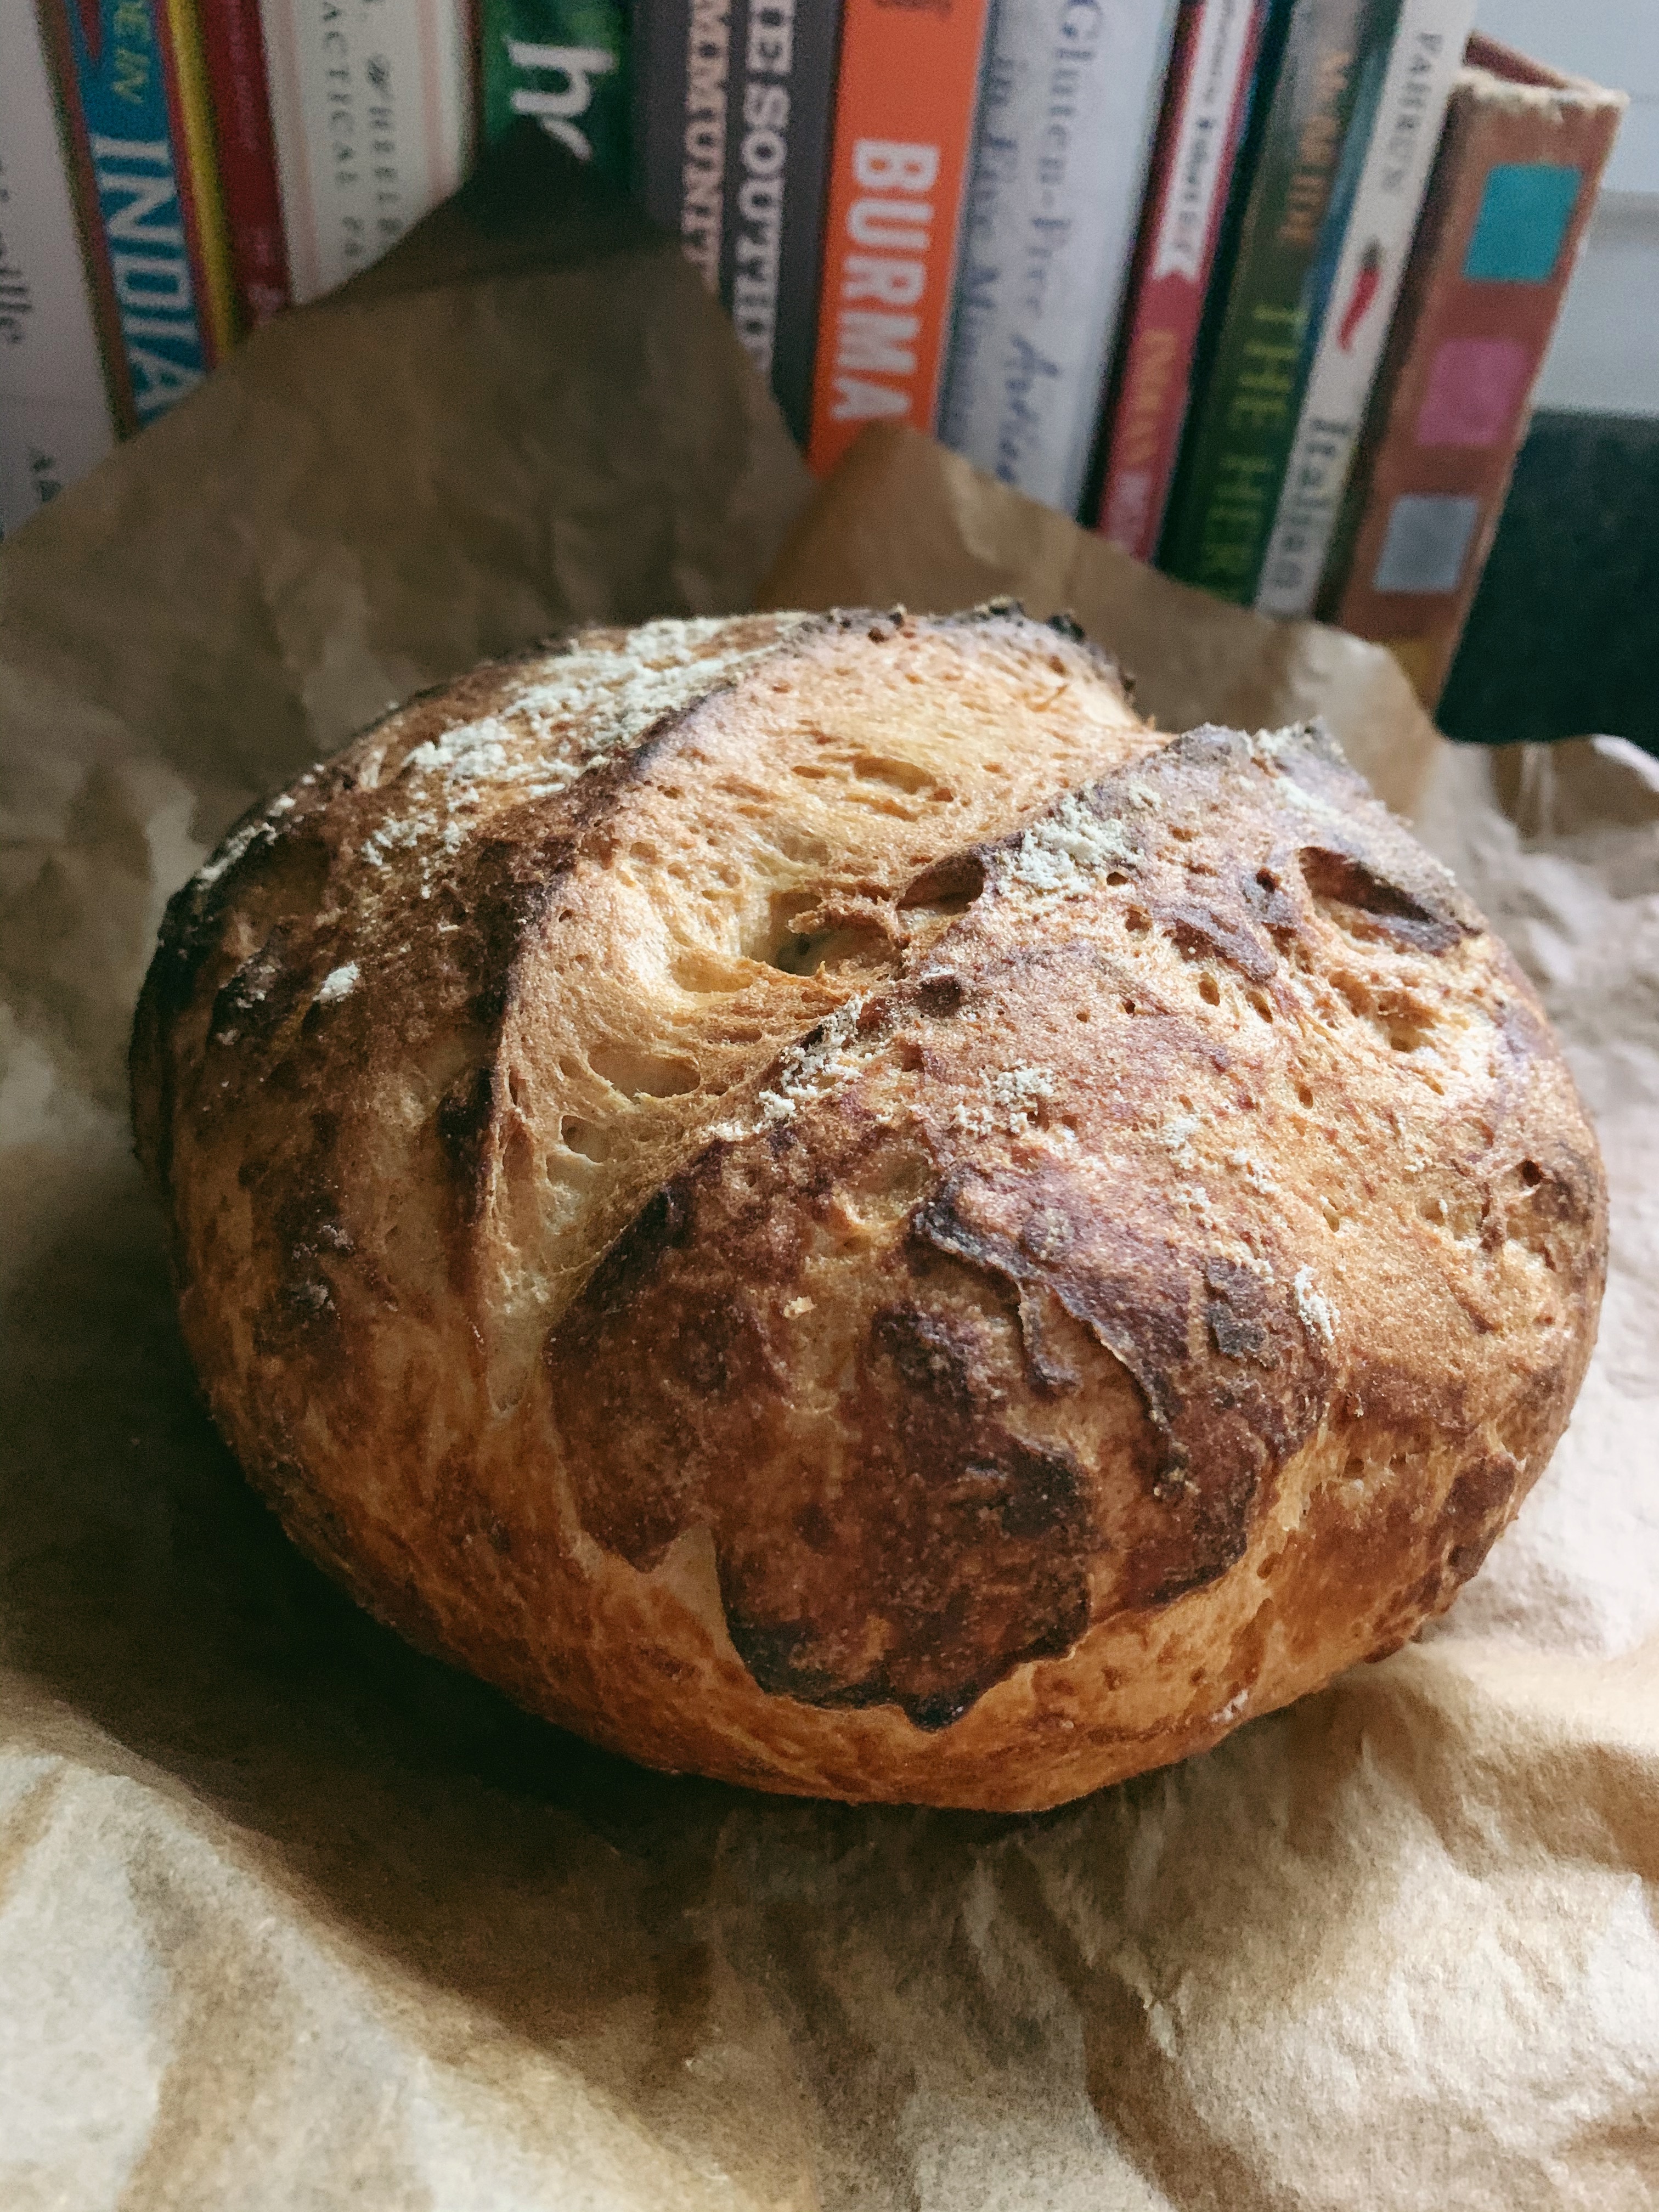
Category Archives: tutorials

Herb Infused Olive Oil

I love having a garden. For the past few years we’ve been hodge podging a garden wherever we were, growing herbs (and incubating vengeful habanero plants) on windowsills, planting tomatoes in the free space at work, always on the brink of what we really wanted.  In a lot of ways we’re still on the brink of the garden we want.  What we’re fostering these days is worlds better than our last garden, but still worlds away from our goal- our dream garden.

Our dream garden (a part of our overall dream house) will have rows and rows of garden space.  There will space for the plants to breathe, to coexist with like-minded plants.  We’ll have fruit trees, all the heirloom varieties you could think of.  There will be a place for Dan to grow hops, his own beer garden.  We’ll have bees and butterflies and probably a unicorn.  Don’t unicorns always live in these idealist scenarios?

But that’s my dream garden.  And while we’re definitely working towards it, we’re not there yet.  So I’m happy with what I have, and what I have is a thriving and happy garden.  A garden that has, despite late planting and the hottest summer on record, managed to produce a quirky array of fruit.  And since I don’t have pets or children and my husband is too sweet to complain about much, my tomatoes have given me something definitive to bitch about.

My most recent foray into both garden adventures and preservation techniques included infusing olive oil with herbs.  Drizzled over fresh tomatoes, pasta, pizza, salad, or sandwiches, an herb infused oil is a great way to add a punch of flavor to a dish.  I opted for three varieties- basil, rosemary, and oregano.  I used old whiskey bottles that I sterilized but you could easily pick up any bottle that sealed tightly, preferably with a plastic or cork lid.  Easy to make, pretty, and festive you could slap on a handmade label and voila! instant gift.  Pair it up with some homemade jam or pickles and you’re a regular Donna Reed.  Put those shoes back on!

Basil Infused Olive Oil

2 cups extra virgin olive oil

4 cups fresh basil

Sterilized bottle

To sterilize the bottle, submerge it in boiling water for at least 10 minutes.

Begin by  rinsing your basil and pressing it dry.  Combine it in a bowl with the oil.  Use an immersion blender to blend until smooth.  In a pot over medium heat, simmer the oil for 1 minute.  Pour the oil through a fine mesh strainer to remove basil clumps.  Repeat.  Use a funnel to pour the oil into the sterilized bottle.  Store in the refrigerator for up to one month.

Rosemary or Oregano Infused Olive Oil

2 cups extra virgin olive oil

10 sprigs herb

Sterilized bottle

Wash your herbs and dry.  To ensure they are dried completely place them in a low temperature oven for 2 minutes.

Place your oil in a skillet over medium heat.  Warm it, but do not let it boil.  Place your herbs in the bottle.  Pour the oil over them.  Cap and store in the refrigerator for up to a month.

**As with any preservation process, there are risks.  If you notice anything abnormal, discard the oil immediately.  Botulism is no fun.**

Growing, Harvesting, & Drying Basil

basil4

Hey party people!  So I spent this past week in New Jersey with family, which means that I spent the week not really cooking and thus not really producing anything for this little corner of the internet.  And yesterday it was all I could do to curl up on the couch and lament the crummy weather, so I wasn’t really that productive here in Maryland either.  And when I woke up this morning I was all jazzed to make something but then it was cold and rainy and the thought of cooking another in between season vegetable made me hide under the covers.

basil7

So I’m using my get out of jail free card for this week.  I dug up an old post that Dan  was supposed to author started and decided that today, when all I want are huevos rancheros with salsa fresca, I would share how we grow, harvest, and dry basil.  In the interest of full disclosure I’ll admit that while we had the same two basil plants (grown from seeds) going strong and producing for over a year, they died this past summer because the only place in our living room that gets direct sunlight is also where the air conditioner is located.  We’re really hoping our next place has outdoor living space.

basil5

Growing basil, like any other plant, means finding the right combination of light, warmth, and water.  Basil needs a good 4-5 hours of direct sunlight and temperatures of 60 and up.  To begin from seeds, fill your pot with dirt, poke a hole with your finger 2-3 inches deep, and sprinkle seeds inside.  Cover with dirt and water, but do not soak.  Water a little daily, sparingly.  Soon you’ll see sprouts.  It’s okay if you have multiples, when they’re 4-5 inches tall you can separate them, leaving 1 per pot.

basil2

Your basil plant will grow steadily until the stem is thick and it’s producing large amounts of leaves.  The key to getting the plant to continue to produce is to keep it from flowering.  This means trimming it once or twice a month, depending on growth, and pinching off any flowers that form.  If you’re regularly using the plant for fresh basil, you shouldn’t have to actually cut it back frequently.  If you’re using it for fresh basil occasionally and would also like to dry some, simply cut off the amount you would like to dry and hang it upside down, from the stem, in a cool dark place.  The leaves shouldn’t get any direct sunlight and should hang until they are fully dried.  Then grind, chop, or leave them whole and enjoy!

basil1

A Perfectly Cooked Steak

Oftentimes I begin to compose posts for this site in my head, far from my computer screen.  Whether I’m driving through suburban Maryland trying to avoid 495 or laying in bed trying to fall asleep, stories will begin to form in my head.  Incidentally this is also how I wrote my wedding vows, over the course of many a late night.  This week I was thinking about this post, how when I was learning to cook meat I would have loved a detailed, in depth post.  In my head, this post began “now that grilling season is upon us.”  Which immediately reminded me that grilling season is not upon us.  That if you listened to that groundhog this week, grilling season will never be upon us.

Anyway, it doesn’t matter that it’s not the appropriate time to grill things.  It doesn’t matter that it is CURRENTLY SNOWING (like, three feet on the ground snowing).  Mostly those things don’t matter because I don’t have a balcony or a backyard and therefore do not have a grill, which means that grilling season doesn’t exist for me.  What does exist is “pan roasting” season, which, in my opinion, is a great way to cook steak.  First of all, let me just say that it took me a really long time to learn how to cook a steak perfectly.  Maybe it had something to do with my being a vegetarian, the fact that my father prefers everything still bleeding, or maybe learning to cook meat is something that just takes time.

In my opinion, a “perfectly” cooked steak is salty and crunchy on the outside with a medium rare center.  Medium rare means pinkish red but warm.  Less cooked alternatives are rare, which is red and warmish and bloody, which is  a cool center.  More cooked alternatives are medium, a solid pink and warm center, medium well (very light pink center), or well done, which is a waste of your money (in my opinion.  Though we do have friends who order their steaks done and dip them in ketchup).  Pan roasting is exactly what it sounds like, cooking over medium heat for a longer period of time on the stove top.  The reason I like pan roasting steaks is partially because, as I mentioned, I don’t have a grill and partially because it creates a delicious crust on the steak, which I think is vital.

As for measuring doneness, I rely on three separate methods (because I have served grossly undercooked meat before and don’t care to repeat it.)  First, there is temperature.  I  use a meat thermometer to take the temperature of the center of the steak, which should be 145 for medium rare.  Secondly, there is the hand test.  With this test you compare the firmness of your hand in various positions to the firmness of the meat.  An open hand has the same firmness as rare meat, thumb to pointer is medium rare, thumb middle finger is medium, thumb to ring finger is medium well, and thumb to pinky is well done.  Finally, there is simply the test of time.  I’ve heard that you don’t want to flip a steak on the grill/in the pan more than once.  I’m not sure why but that always sticks with me while I’m cooking steak.  So, I try and decide on a time per side based on the thickness of the steak.  If the steak is 1/2″ thick I’ll cook it 8-10 minutes per side.  For a steak that’s 1″ thick I’ll go 10-12 minutes.  Usually I combine a general time forecast with a meat thermometer and frequent firmness tests.  It’s obsessive, yes, but the payoff (a perfectly good steak) is large.

Finally, lets discuss seasoning.  Kosher salt and pepper.  That’s it. I use my cast iron pan to pan roast, sprayed with canola oil.  I sprinkle a generous portion of kosher salt and pepper on each side and voila.  Actually, lets also discuss what kind of steak you’re buying.  For this method, eating it with only salt and pepper to bring out the flavor, I buy grass fed, organic strip steak.  Because the flavor is so amazing that it’s an almost otherworldly experience.  It’s just… perfect.  You could also use filet mignon, porterhouse, sirloin, or t-bone.  The key is cooking it over low to medium heat for a longer amount of time so the flavor has the opportunity to really blossom.  Also, after you’ve cooked it, you must let it rest.  ”Resting” the meat is just what it sounds like, letting it sit.  You do this so the juices can redistribute, which is vital to having a juicy, delicious steak.  Now if you’ll excuse me I’m off to doing what I’ve been doing best lately, being sick in the snow.  Hello Gilmore Girls marathon!

dan measuring the snow outside our window. how much? too much.

Pan Roasted Strip Steak

1 lb strip steak (enough for 2)

1 tbsp kosher salt

1 tbsp black pepper

Heat a cast iron pan over medium low heat (3 or 4 or a gas stove).  Spray with cooking oil and let the pan warm.

Pull out your steak and pat it down with a paper towel.  Meat won’t get that crisp edge that is essential for the perfect steak unless it is dry when it touches the pan, so dabbing it down is essential.  Sprinkle half your salt & pepper on each side.

When your skillet is hot, place the steak on the pan and set a timer for 12 minutes (for a steak about 1″ thick).  When the 12 minutes is up, flip the steak and reset the timer for another 12 minutes.  During this time you can also take the temperature and check the firmness.  At the end of the final 12 minutes, or when the inner temperature is 145 for medium rare, remove the steak from heat.  Set aside and let rest 10 minutes.

Carve and serve.

Cutting an Onion

The Finer Points.

So in my life list I pledged to start creating one video a month for b&s. This was in lieu of an attempted foray into video tutorials last year that went nowhere. Later I regretted not being more active so today I bring you this month’s video installment.

I took advantage of a brief moment of clarity in Ulysses’ final days and edited and uploaded a video I made last week of how to chop an onion with minimal assault to your tear ducts.  I am constantly a victim of onion induced tears, so when I learned the proper way to cut an onion I was super excited.  I’m probably still not doing it right but it works for me and I hope it works for you too.

The video walks you through cutting an onion, but I’ll do it here too just to be redundant.  First, slice the onion down the middle, leaving half of the root on each half.  The root is going to be what holds the onion together while you slice it.  Cut off the end opposite the root and peel the papery layers off.  Now make vertical slices across the onion, keeping your knife short of the root.  You want to make sure the root stays connected to the onion as long as possible so that it can hold it all together.  Turn your knife and cut into the onion, towards the root (parallel to the original cut, when you cut the onion in half).  Finally, turn your knife again and slice the onion off in rows.  The cuts you made earlier will mean that what falls off is cut almost completely uniformly.

Enjoy!


Cutting an Onion from elena rosemond-hoerr on Vimeo.

Baking with Flax Seed

flax2

I’m the first person to stand up and protest when my favorite foods are butchered in the name of diets.  When I’m trying to be health-conscious, I opt to have a larger salad and a lean piece of meat.  I’d rather have a smaller piece of pie with no ice cream than a large piece of pie whose integrity has been degraded by whole wheat crusts or sugar substitutes.  There are certain foods, however, that I think work really well once they’ve been healthed-up.

flax1

When Dan and I travel to visit people, we try and tailor the food we bring with us to their tastes.  I always try and remember who would prefer the banana cream pie and who would rather the pumpkin muffins.  When we’re going to be in a mixed crowd, we like to bring a variety of foods that all can enjoy, no matter their taste or health requirements.  This week we visited West Virginia (and parts of western Maryland) with Dan’s parents, his sister, her husband, and their daughter.  I brought my bourbon white peach pie and an array of bagels.  I decided to make our personal favorite, jalapeño.  I also decided to make flax seed bagels.

flax3

image courtesy of wikipedia

Adding flax seed to baked goods does a few things.  For one, the health benefits of flax seeds are incredible.  Flax seeds benefit the heart, fight cancer, and for all the good press they get, they probably fight crime.  Flax is also a good substitute for shortening, eggs, and other oils.  According to some of the research I did, adding flax requires a little extra water, the ratio being 1:3, so for each tablespoon of flax seed you add three tablespoons of water.  When you add flax to a baked good, you should lower the baking time and potentially increase the proofing process.  Everything I read suggested that the changes will vary depending on what you’re making, and that you really just have to experiment.  For the bagels, the one notable difference was that the dough became really sticky, which was a little harder to handle.  However, they tasted great and everyone appreciated the heart-healthy breakfast option.

flax4

Dan and I tandem biking on the Rails to Bike Trail in Hanover, Maryland.

Here are some great reference articles:

ameriflax

fresh food perspectives

ehow