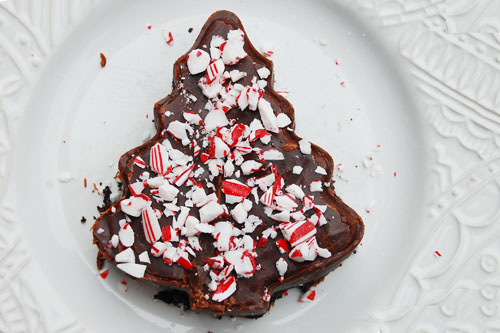
Blog - biscuits and such
southern food blog
10088
paged,page-template,page-template-blog-large-image-whole-post,page-template-blog-large-image-whole-post-php,page,page-id-10088,paged-143,page-paged-143,ajax_fade,page_not_loaded,,select-child-theme-ver-1.0.0,select-theme-ver-2.8,wpb-js-composer js-comp-ver-4.3.5,vc_responsive
 

Peppermint Fudge


Thanksgiving is my favorite holiday.  That is, that I like the actual day of Thanksgiving more than any other holiday.  Christmas, Easter, Valentine’s Day, my birthday.  Thanksgiving wins.  It wins because its only goal is food.  The only point is to come together with people you love and enjoy delicious food.  That being said, there are few times of year I love more than the stretch between Thanksgiving and New Year.


I love singing Christmas carols.  I love decorating my house.  I love baking, I love shopping for the people I love.  I love giving presents, even if waiting to give someone something special kills me.  I love going to church on Christmas eve and watching my dad try to stifle giggles everytime the preacher references the sweet baby Jesus.


I love that when we celebrate with my grandfather’s family my great Aunt Beth puts a flashing Christmas light in her belly button.  I love that growing up, my Uncle Ron used to make us wait on the steps Christmas morning for what seemed like hours while he got showered and shaved and dressed.  I love that on Christmas day, after the presents and before the family dinner, my sisters and I lay around and eat.  I love that my husband can barely contain himself after buying something for me, but swears up and down that he won’t tell me what it is until Christmas.  I love this season.  And to kick it off this weekend I listened to Christmas music, I watched Love Actually, I decorated our tiny apartment, and I made fudge.  Peppermint fudge with an chocolate creme cookie base and candy cane sprinkles.


Peppermint Fudge


1/2 cup milk

1/2 cup heavy cream

2 1/2 cups sugar

3 tbsp butter

4-6 oz. chocolate

1 tsp peppermint extract

10 chocolate creme cookies

2-3 candy canes


In a heavy pan, combine milk, cream, chocolate, sugar, and half of the butter.  Cook over medium heat until everything has melted.  Bring to a boil.  Insert a candy thermometer and allow to boil, stirring occasionally, until the temperature reaches 240.  Cut the heat.  Add the remaining butter and let sit for 10-12 minutes.


While your fudge is cooling, line a small cake pan with wax paper.  Crumble cookies and spread over the bottom of the pan.


Now comes the hard part.  With a spoon, beat the fudge for at least 7 minutes.  This is going to make your arm feel like it will fall off, but keep beating to incorporate air into the fudge.


After 7 minutes (good job!) pour the fudge over the cookies, spreading evenly.  Let sit overnight to cool.  The next day, use a cookie cutter (or just cut squares) to cut out pieces.  Crush candy canes and sprinkle on top.

SaveSave

Read More

Apple Pie Filling, Preserved

One incredible side effect of attending art school is that holiday presents are built in to the whole experience.  What should I give mom this year inevitably ends with “well, I made this awesome (fill in the blank depending on my course load) that she’d totally love.”  And while I have no idea whether or not my family appreciated getting Elena Rosemond originals every year for Christmas, they always pretended like they did.  After college the handmade trend continued, though I’d like to think I’ve improved it.  Moving on from my priceless works of art, we’ve started gifting handmade and homemade bundles full of food.

While I, personally, think that this is our best holiday bundle yet I won’t spoil the fun for our families about what will be in them- except for this apple pie filling.  Yesterday I peeled, sliced, and processed 15 pounds of apples, the end result being enough apple pie filling for a lot of pies.  Canned in a ginger, cinnamon, and nutmeg solution, these are ready to pop open anytime you want a classic apple pie.  Just add crust.  Or, if you’re my brothers, just eat out of the jar with a fork.  That’ll work too, Ryan. The same probably goes for my 20 year old sister Genevieve.

The recipe that I’m giving is for 12 1-quart jars.  A quart jar of apple pie filling is the perfect amount to fill a shallow pie dish, or for four to six cup pies.  Two of these will perfectly fill a deep pie dish.  Also, because of the nature of anything homemade, there is a good chance not every jar will be equal.  I’ll be gifting mine with a note that instructs the recipients to add flour if the canning liquid is a little thin, or to add water if the canning liquid is too thick.  After they’ve filled a pie crust bottom with the filling, it can be topped in a traditional or lattice top and baked at 425 for 15 minutes and then at 325 for 50 minutes.

Apple Pie Filling {Preserved}

12-14 pounds apples (gala, honeycrisp)

6-7 quarts (20-25 cups) water

2 cups corn starch

2 tbsp cinnamon

3 tbsp ginger

1 tbsp nutmeg

5 cups sugar

12 1-quart jars

Canning equipment

5 lemons

Begin by peeling your apples.

Next, sterilize your jars and lids by boiling them for at least ten minutes.  As they are sterilizing, slice your apples into thin slices.

Fill each jar with apples, leaving about one inch of room at the top.

Heat the water you are planning to use for canning.  Your pot needs to be deep enough that the cans are completely covered in water.  Bring this water to a boil.

Next, combine water, sugar, spices, and corn starch in a large pot.  Add the corn starch very slowly, stirring it in completely before adding more.  This will help prevent clumps.  Bring to a boil.  Cut the heat and add the juice from the lemons.  Ladle liquid into each jar, leaving about 1/2″ at the top.  Wipe the rim of the jar and top with a sterilized lid.  Screw on the band and continue until all your jars are filled.

When your jars are filled place them in the hot water bath.  Boil them for 30 minutes.  Then remove them and, carefully, tighten the lid.  As they cool, the jars will make a ping sound which is how you’ll know they’ve sealed.  Let them cool and then decorate them however you’d like for the perfect gift!

**As with any preservation process, there are risks.  If you notice anything abnormal, discard the filling immediately.  Botulism is no fun.**

Read More

Pumpkin Swirl Cheesecake

Not long ago (i.e. january 17, 2010) I made my first cheesecake.  And I was nervous.  Very nervous.  I was convinced it was going to be horrible, that I would do everything wrong, that the world would mock me.  Instead, it was delicious and nobody mocked me at all.  Well, Dan probably mocked me for being nervous.  The point is, once I successfully made a cheesecake without anyone dying, I was no longer nervous.  I was more willing to experiment, to try things that will probably fail.  And experiment I have.  Which brings us to the final Thanksgiving 2010 recipe.  High off of my past cheesecake successes I tried my hand at a pumpkin swirl cheesecake.  I was mildly successful at the swirl part, but the chocolate/pumpkin combination was delicious.

For more recipes to get you through this holiday season, visit our Guide to Holiday Eating.  Finally, here is a sneak peek at some of the changes to come in the Biscuits & Such redesign.  We’d love to hear your feedback!

Pumpkin Swirl Cheesecake

Cheesecake:

4 8oz. blocks cream cheese, softened

1 stick butter

1 cup pumpkin puree

4 eggs

1/2 cup brown sugar

1 tsp ginger

1/2 tsp ground cloves

1 tsp cinnamon

Chocolate:

1 cup chocolate

1 cup heavy cream

Crust:

6 graham crackers

1 tsp ginger

1/2 tsp ground cloves

1 tsp cinnamon

1/2 stick butter, melted

Start with the crust.  Combine graham crackers and spices in a food processor.  Blend until crumb.  Mix in melted butter.  Rub springform pan down with butter.  Press graham cracker mix into the bottom of the springform pan.  Bake at 350 for 10 minutes. Set aside and let cool.

Next, make your ganache.  Melt chocolate in a double boiler.  Whisk in heavy cream.  Pour 5/8 into the springform pan.  Set aside the rest.

Cream cheese in a mixer on medium.  Add butter.  Add in sugar and pumpkin.  Add spices.  Add eggs, one at a time.

Heat your oven to 350 and boil a teapot of water. Wrap bottom of springform pan in tin foil to prevent leaks.

Spoon cheese mixture into springform pan.  Using a the handle of a wooden spoon, swirl together chocolate and pumpkin.  Add in extra chocolate, in small amounts, to create swirl.

Place the pan in a larger roasting pan. When the water is boiling, pour around the springform into the roasting pan, surrounding the cheesecake with 2 inches of water.

Bake at 350 for 1 hour & 5 minutes (65 minutes). Take out while the center is still soft, it will set later. Let cool and chill overnight.

Read More