Blog - biscuits and such
southern food blog
10088
paged,page-template,page-template-blog-large-image-whole-post,page-template-blog-large-image-whole-post-php,page,page-id-10088,paged-157,page-paged-157,ajax_fade,page_not_loaded,,select-child-theme-ver-1.0.0,select-theme-ver-2.8,wpb-js-composer js-comp-ver-4.3.5,vc_responsive
 

A Perfectly Cooked Steak

Oftentimes I begin to compose posts for this site in my head, far from my computer screen.  Whether I’m driving through suburban Maryland trying to avoid 495 or laying in bed trying to fall asleep, stories will begin to form in my head.  Incidentally this is also how I wrote my wedding vows, over the course of many a late night.  This week I was thinking about this post, how when I was learning to cook meat I would have loved a detailed, in depth post.  In my head, this post began “now that grilling season is upon us.”  Which immediately reminded me that grilling season is not upon us.  That if you listened to that groundhog this week, grilling season will never be upon us.

Anyway, it doesn’t matter that it’s not the appropriate time to grill things.  It doesn’t matter that it is CURRENTLY SNOWING (like, three feet on the ground snowing).  Mostly those things don’t matter because I don’t have a balcony or a backyard and therefore do not have a grill, which means that grilling season doesn’t exist for me.  What does exist is “pan roasting” season, which, in my opinion, is a great way to cook steak.  First of all, let me just say that it took me a really long time to learn how to cook a steak perfectly.  Maybe it had something to do with my being a vegetarian, the fact that my father prefers everything still bleeding, or maybe learning to cook meat is something that just takes time.

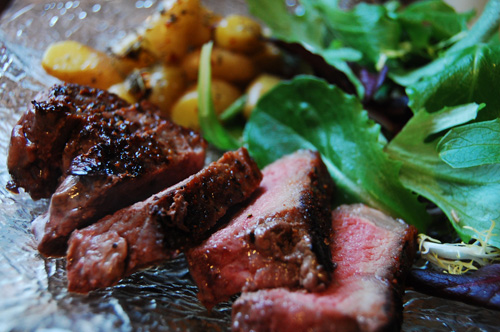
In my opinion, a “perfectly” cooked steak is salty and crunchy on the outside with a medium rare center.  Medium rare means pinkish red but warm.  Less cooked alternatives are rare, which is red and warmish and bloody, which is  a cool center.  More cooked alternatives are medium, a solid pink and warm center, medium well (very light pink center), or well done, which is a waste of your money (in my opinion.  Though we do have friends who order their steaks done and dip them in ketchup).  Pan roasting is exactly what it sounds like, cooking over medium heat for a longer period of time on the stove top.  The reason I like pan roasting steaks is partially because, as I mentioned, I don’t have a grill and partially because it creates a delicious crust on the steak, which I think is vital.

As for measuring doneness, I rely on three separate methods (because I have served grossly undercooked meat before and don’t care to repeat it.)  First, there is temperature.  I  use a meat thermometer to take the temperature of the center of the steak, which should be 145 for medium rare.  Secondly, there is the hand test.  With this test you compare the firmness of your hand in various positions to the firmness of the meat.  An open hand has the same firmness as rare meat, thumb to pointer is medium rare, thumb middle finger is medium, thumb to ring finger is medium well, and thumb to pinky is well done.  Finally, there is simply the test of time.  I’ve heard that you don’t want to flip a steak on the grill/in the pan more than once.  I’m not sure why but that always sticks with me while I’m cooking steak.  So, I try and decide on a time per side based on the thickness of the steak.  If the steak is 1/2″ thick I’ll cook it 8-10 minutes per side.  For a steak that’s 1″ thick I’ll go 10-12 minutes.  Usually I combine a general time forecast with a meat thermometer and frequent firmness tests.  It’s obsessive, yes, but the payoff (a perfectly good steak) is large.

Finally, lets discuss seasoning.  Kosher salt and pepper.  That’s it. I use my cast iron pan to pan roast, sprayed with canola oil.  I sprinkle a generous portion of kosher salt and pepper on each side and voila.  Actually, lets also discuss what kind of steak you’re buying.  For this method, eating it with only salt and pepper to bring out the flavor, I buy grass fed, organic strip steak.  Because the flavor is so amazing that it’s an almost otherworldly experience.  It’s just… perfect.  You could also use filet mignon, porterhouse, sirloin, or t-bone.  The key is cooking it over low to medium heat for a longer amount of time so the flavor has the opportunity to really blossom.  Also, after you’ve cooked it, you must let it rest.  “Resting” the meat is just what it sounds like, letting it sit.  You do this so the juices can redistribute, which is vital to having a juicy, delicious steak.  Now if you’ll excuse me I’m off to doing what I’ve been doing best lately, being sick in the snow.  Hello Gilmore Girls marathon!

dan measuring the snow outside our window. how much? too much.

Pan Roasted Strip Steak

1 lb strip steak (enough for 2)

1 tbsp kosher salt

1 tbsp black pepper

Heat a cast iron pan over medium low heat (3 or 4 or a gas stove).  Spray with cooking oil and let the pan warm.

Pull out your steak and pat it down with a paper towel.  Meat won’t get that crisp edge that is essential for the perfect steak unless it is dry when it touches the pan, so dabbing it down is essential.  Sprinkle half your salt & pepper on each side.

When your skillet is hot, place the steak on the pan and set a timer for 12 minutes (for a steak about 1″ thick).  When the 12 minutes is up, flip the steak and reset the timer for another 12 minutes.  During this time you can also take the temperature and check the firmness.  At the end of the final 12 minutes, or when the inner temperature is 145 for medium rare, remove the steak from heat.  Set aside and let rest 10 minutes.

Carve and serve.

Read More

Macaroni & Cheese

For the past two days I’ve been holed up in my apartment, sick.  Yesterday I took in way more Criminal Minds/Gilmore Girls than is probably healthy (though they may cancel each other out) and got winded chasing down the UPS man who was trying to drive off without delivering our new computer.  That’s right, ladies & gents, this recipe is coming at you from our brand new 27″ iMac, dubbed Admiral Adama.  And yes, we named our beautiful new computer after Edward James Olmos’ character on Battlestar Galactica.  We’re nerds.  We’re also planning on naming our puppy Starbuck.

Anyway I am incapable of just being home sick because I always feel I should be doing something.  So I made macaroni and cheese.  Because I didn’t feel good and I wanted the creamy, sweet and spicy goodness that homemade macaroni and cheese can be.  Plus, once the computer was delivered I decided to wait for Dan to get here to set it up so taking pictures of cooking and fantasizing about them on the giant HD screen was as close to feeling good as I could get.  And, naturally, promptly after sticking the dish in the oven I collapsed on the couch, exhausted.

Homemade macaroni and cheese is a pretty simple meal.  Not nearly as simple as opening a packet of powdered cheese and dumping it straight into boiled pasta, but you know, easy compared to making your own bread or some of the other things I encourage you to do here on a regular basis.  In fact, I would venture a guess that the majority of you could pull this off on a weeknight.  Or you could make it ahead and freeze it.  What I’m trying to say is that I made it while dying of the flu* so it shouldn’t be a problem for you to pull off anytime.  Just some shredding, boiling, combining, and baking.

I’m going to go ahead and admit that editing these photos was way more of a pleasure than cooking, or even eating, this dish.  I mean, this computer (and it’s giant screen) has had me making a stream of exclamations that sounds more like a “that’s what she said” joke than anything else.  But I can’t help myself, I’m totally enamored and expect to fall further in love once Dan and I have figured out the logistics of sharing a computer.  That, naturally, will be the hard part.

This could be because I’m almost as much of a computer nerd as I am a food geek.  In fact, sitting in front of it’s giant screen right now and thinking how much more I like this than editing on the couch with my 15″ MacBook, I’d venture to say that really only pie could beat this feeling right now.  Anyway, back to my disjointed and rambling post.  This recipe is, as I said, easy.  But also delicious by all mac n’ cheese standards.  It’s creamy, filling, sweet and a little spicy, with just the right ratio of gooey inner cheese to crunchy outer cheese.  I use spices such as paprika and nutmeg to give it a different flavor profile, but feel free to tweak it to your wants and needs.  It’s great for curling up in front of the tv and watching your favorite bad shows, perfect for this time of year when your body is TIRED OF THE COLD but they’re forecasting snow.

*I may not be literally dying.  It just feels like it. {drama queen} Also, if you look closely at the last picture, you’ll see Edward J. Olmos on the far right of the screen.

Macaroni & Cheese

1 lb penne pasta

1 1/2 cups white cheddar cheese

1 cup extra sharp yellow cheddar cheese

1/2 cup parmesan cheese

4 tbsp flour

4 cups milk

1/2 cup heavy cream

1 tsp nutmeg

1/4 tsp cayenne pepper

1/2 tsp cinnamon

1/2 tsp paprika

1/2 tsp garlic powder

1/2 tsp salt

1/2 tsp pepper

1 small lemon, juiced

1/2 stick butter

Shred all of your cheese.  Measure out all your spices.

In a sauce pan, heat milk & cream over low/medium heat.  If the pan gets too hot, the milk will curdle.

In another pan, melt butter.  Whisk in flour, making sure there are no clumps.  Slowly whisk in warm milk mixture.  Remove from heat and add 3/4 of all the cheeses and the spices.  Continue to stir until cheese has melted and formed a sauce.  The sauce should be thick enough to coat the back of a spoon.  Stir in the lemon juice

Boil your pasta 3-4 minutes until slightly cooked but still very firm.  Preheat your oven to 350.

Drain your pasta and pour into casserole dish.  Pour cheese sauce over and stir slightly to coat.  Top with the remaining cheese, spread evenly over the top.  Bake for 35 minutes, or until the pasta is tender and the cheese has a nice brown crust.

Read More

Cutting an Onion

The Finer Points.

So in my life list I pledged to start creating one video a month for b&s. This was in lieu of an attempted foray into video tutorials last year that went nowhere. Later I regretted not being more active so today I bring you this month’s video installment.

I took advantage of a brief moment of clarity in Ulysses’ final days and edited and uploaded a video I made last week of how to chop an onion with minimal assault to your tear ducts.  I am constantly a victim of onion induced tears, so when I learned the proper way to cut an onion I was super excited.  I’m probably still not doing it right but it works for me and I hope it works for you too.

The video walks you through cutting an onion, but I’ll do it here too just to be redundant.  First, slice the onion down the middle, leaving half of the root on each half.  The root is going to be what holds the onion together while you slice it.  Cut off the end opposite the root and peel the papery layers off.  Now make vertical slices across the onion, keeping your knife short of the root.  You want to make sure the root stays connected to the onion as long as possible so that it can hold it all together.  Turn your knife and cut into the onion, towards the root (parallel to the original cut, when you cut the onion in half).  Finally, turn your knife again and slice the onion off in rows.  The cuts you made earlier will mean that what falls off is cut almost completely uniformly.

Enjoy!


Cutting an Onion from elena rosemond-hoerr on Vimeo.

Read More